Using the Dock Layout nodes
Use the Dock Layout nodes to place nodes relative to each other along the sides of a Dock Layout node. You set the side along which you want to place a node in a Dock Layout node with the Side property. Dock Layout nodes arrange its items in a subtractive way: after positioning the first node, the Dock Layout node uses the remaining space to position the next node, and so on. When arranging its child nodes, a Dock Layout node uses its entire size.
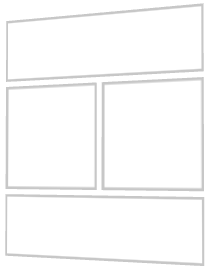
Dock Layout nodes determine the position of their child nodes by:
- The order in which you the child nodes appear in the scene graph.
- The value of the Side property in each child node of a Dock Layout node. The Dock Layout node sets each child node to occupy that entire side.
- The number of the child nodes in a Dock Layout node.
Creating a Dock Layout node
To create a Dock Layout node:
- In the Project press Alt and right-click the node where you want to create a Dock Layout node and select either Dock Layout 3D, or Dock Layout 2D.
Note that you can create a 3D node only inside 3D nodes, and 2D node only inside 2D nodes.
- In the Project add child nodes to the Dock Layout node.
For example, if you created a Dock Layout 3D, add several Plane nodes, if you created a Dock Layout 2D, add several Image nodes.
As you add child nodes, the Dock Layout node automatically positions them.
- In the Project select all child nodes of the Dock Layout node, in the Properties click
 add to each the Side property, and set it to:
- Left to set the child node to occupy the left part of the Dock Layout node.
- Right to set the child node to occupy the right part of the Dock Layout node.
- Top to set the child node to occupy the top part of the Dock Layout node.
- Bottom to set the child node to occupy the bottom part of the Dock Layout node.
- (Optional) When you want the last child node in a Dock Layout node to occupy the remaining space of the Dock Layout node, add to the Dock Layout node the Last Item Fill property, and enable it.
-
(Optional) To clear the area around child nodes in a layout, in the Project select child nodes in the layout, in the Properties click , and add and set the margin properties:
- Depth Margin to clear the area in the back and the front of a child node.
- Horizontal Margin to clear the area on the left and the right sides of a child node.
- Vertical Margin to clear the area on the bottom and the top of a child node.
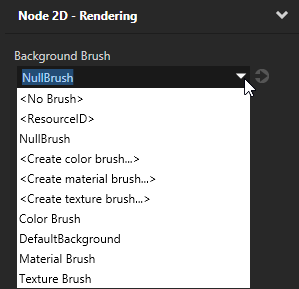
Setting the background of a Dock Layout 2D node
Use brushes to set the background of 2D nodes. In Kanzi all 2D nodes by default have transparent background.
To set the background:
- Create a Color Brush, a Texture Brush, or a Material Brush. See Using brushes.

- In the Project select the 2D node the background of which you want to paint.
Note that you can set only the background of 2D nodes.
- In the Properties click , add the Background Brush property, and select the brush you created in the first step.
Using the Dock Layout 3D node in the API
For details, see the API reference.
Using the Dock Layout 2D node in the API
For details, see the API reference.
See also
Using the Flow Layout nodes
Using the Grid Layout nodes
Using the Stack Layout nodes
Using the Trajectory Layout nodes
Layout control nodes

Open topic with navigation